SwiftUI Series (Part 1)
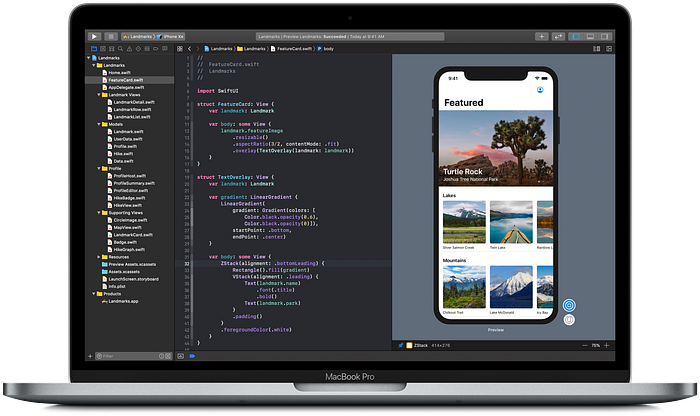
I started learning SwiftUI few weeks back and in this tutorial series I will write what I learned so far. Let’s learn together and end this series when we all become master to this new framework
Declarative Programming
In computer science, declarative programming is a programming paradigm — a style of building the structure and elements of computer programs — that expresses the logic of a computation without describing its control flow. Declarative programming is an alternative of imperative programming
For example, let’s say we have a property name text in the controller which is driving the label.
In imperative world every time text property update we need to call the updateLabel method. Here we are manually controlling our program flow
In declarative/reactive world we can somehow bind updateLabel method to this text property and whenever this property change our updateLabel method will react and executed
Traditionally, you’ve near always seen this in observer pattern where it provides a common method for providing a “trigger” to allow information to be updated whenever such a change is made (or, in more common OO terms, when an “event” is fired.) In that sense, it provides a simple mechanism for allowing the basic concept of reactive programming to happen in OO (and sometimes other) style languages.
In the RxSwift blog series I wrote this definition . If you want to learn Rx I made five parts that cover almost every Rx concept
SwiftUI Introduction
- Introduced in 2019 WWDC
- Available from iOS 13 onwards
- Need Xcode 11 or above
SwiftUI Definitions
State driven declarative UI framework.
Explanation:
Here they means State driven ( as I explained in above Declarative Programming section) means UI is bind with some data and when data update UI update automatically.
In definition there is another term declarative UI. Here in SwiftUI they mean Traditionally we have created UI ‘s using imperative UI. Strict and explicit user interfaces describing sizes, adding subviews and relationship between views . Declarative UI however is where you describe your UI in terms of its hierarchy and reusable components and then you trust framework to translate what you have written and it will do all the hard work to render a visual result with huge performance as compared to UIKit. In short
OR
It is a framework for creating user interfaces that dramatically reduces the amount of boilerplate code we need to create UI’s (Meaning you can focus on what makes your app unique)
OR
SwiftUI is a new framework that is designed to give you the shortest path to building a great app.(means giving you the shortest path to building great user interfaces.But even though SwiftUI is a new framework, a lot of it will already look familiar to you. And that’s because it has all of the basic components that you’d expect from a UI framework.It has controls like buttons and text fields. It has layout containers like stacks and lists. It has drawing, animations and gestures. And SwiftUI even embraces platform-specific concepts like menus on the Mac, the Digital Crown on Apple Watch, and the Siri remote on Apple TV. And so the takeaway here is that they ’re not trying to reinvent the wheel with SwiftUI.But as we all know, the reality is that just knowing how to use these kinds of components is not what it takes to build a great app, because a great app also needs to account for these kinds of things.It needs to be accessible and work with features like dynamic type.It needs to adapt to different devices and screen sizes and input types.And it needs to come alive with things like interactive animations and support for system features like Dark Mode and Drag and Drop.These are the kinds of things that help your app to reach the largest possible audience and also help keep it feeling modern.Now we all know that even this though is not the whole picture, because of course you also add in your own unique features that make your apps stand out from the crowd.So I just want to take a moment to step back and acknowledge that this is a lot of stuff to have to learn.It’s a lot of stuff to have to code and maintain, and so how can SwiftUI help you with all this? Well, think about your own apps for a moment.First, you have those basic features that everyone expects from your app, like controls and navigation, being accessible and adapting your layout to different devices.We need to do these things and we need to do them right in order to build a really great app.So the goal of SwiftUI is pretty simple: we want you to spend as much of your time as possible on that fun stuff and less time on the basic stuff, but without compromising on quality. And this is what we mean by giving you the shortest path to a great app. Because all of you are building great apps already.)
OR
SwiftUI is an innovative, exceptionally simple way to build user interfaces across all Apple platforms with the power of Swift.
SwiftUI Declarative Programming
Previously we define Declarative Programming definition specfic to data , so in short you can refer Declarative as a way to tell system in upper level and system will do all it’s job in a best possible manner, it can be either render UI or it can be rerender UI when data change or dive UI when data change so finally
SwiftUI enables you to do declarative app development — you’ll develop great apps faster… once you learn to “think different.” Declarative app development means you declare both how you want the views in your UI to look and also what data they depend on. The SwiftUI framework takes care of creating views when they should appear and updating them whenever there’s a change to data they depend on.
You declare how your view’s state affects its appearance, and how SwiftUI should react to changes in view’s data dependencies. Yes, there’s a definite reactive feeling to SwiftUI! So if you’re already using one of the reactive programming frameworks, you’ll probably have an easier time picking up SwiftUI.
Background
SwiftUI’s introduction in 2019 creates another opportunity for a paradigm shift in the industry. After years using UIKit and AppKit to create user interfaces, SwiftUI presents a fresh, new way to create UI for your apps. IN many ways, SwiftUI is much simpler and powerful than its predecessors, and even more importantly, it’s cross-platform over the Apple ecosystem. One of the most important things, though, is SwiftUI’s declarative nature. For years, developers have worked with imperative programming models, dealing with state-management problems and complex code. But now, you have in our hands a declarative, straight-forward way to build amazing user interfaces. And don´t worry; if you loved working with UIKit or AppKit, rest assured that you can integrate those frameworks with your SwiftUI code.
Benefits
When we further dig into this framework with example then majority of the benefits we will understand
- Remove all UI inconsistencies
- Ended debate between create UI from code or from Interface builder
- Declarative UI update
- Some aspect of Reactive Programming
- There is only one tunnel / path where you ca update your UI
- Easy to create compositional UI
- Easy to create atomic reusable component
- Easy to refactor
- Adaptive UI
- Less and easy code
- Automatically do localisation, and accessibility features
- Towards the Value type Protocol Oriented Programming
- You Never face over and under constraints error
- Compatible with UIKit
- Live rendering
- learn once, then apply everywhere.(API is consistent across platforms”)
In this whole series , this blog part I will refer majority of the time . Since most of the people understand benefit with the example
Getting Started
To get started, please create a new iOS project in Xcode called “SwiftUISeries”, choosing the Single View App template and choosing SwiftUI for the User Interface.
There’s a big blank space next to the code, with this at the top: Click Resume, and wait a while, to see the preview: “Note: If you don’t see the Resume button, click the Editor Options button, and select Canvas: Note: Instead of clicking the Resume button, you can use the very useful keyboard shortcut Option-Command-P. It works even when the Resume button isn’t displayed immediately after you change something in the view.
Creating your UI
Your SwiftUI app doesn’t have a storyboard or a view controller — ContentView.swift takes over their jobs. You can use any combination of code and drag-from-object-library to create your UI, and you can perform storyboard-like actions directly in your code! Best of all, everything stays in sync all the time!
Xcode 11 includes intuitive new design tools that make building interfaces with SwiftUI as easy as dragging and dropping. As you work in the design canvas, everything you edit is completely in sync with the code in the adjoining editor.
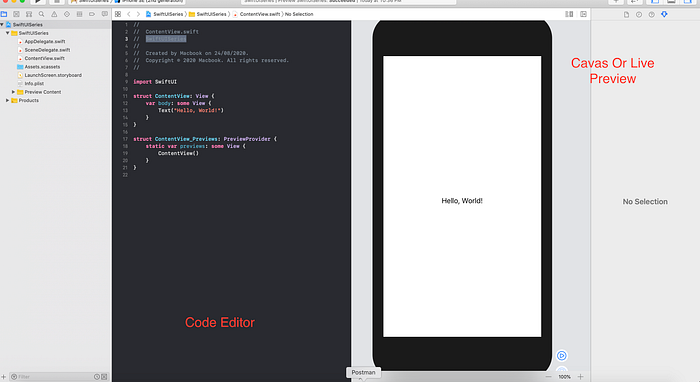
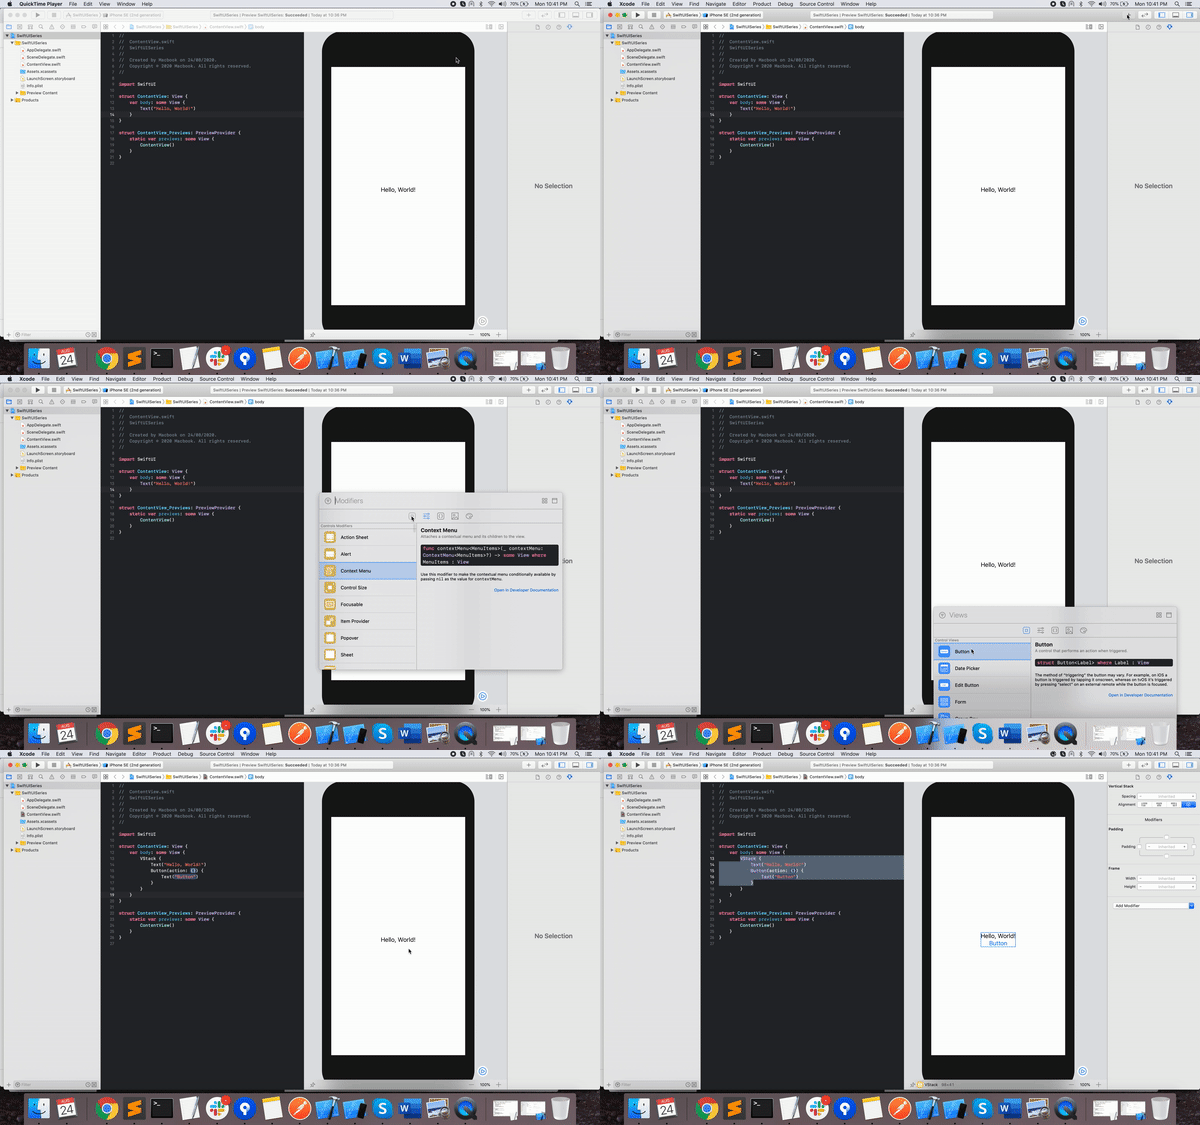
In SwiftUI code in Code Editor is instantly visible as a preview as you type, and any change you make to that preview immediately appears in your code. Xcode recompiles your changes instantly and inserts them into a running version of your app, visible, and editable at all times. As shown in Gif 1 as we add Button in canvas it automatically added in code and you can do vice versa as well. In swiftUI View definition is always swift code and and visual also generate swift code , so the person who like UI through code and through editor can live together
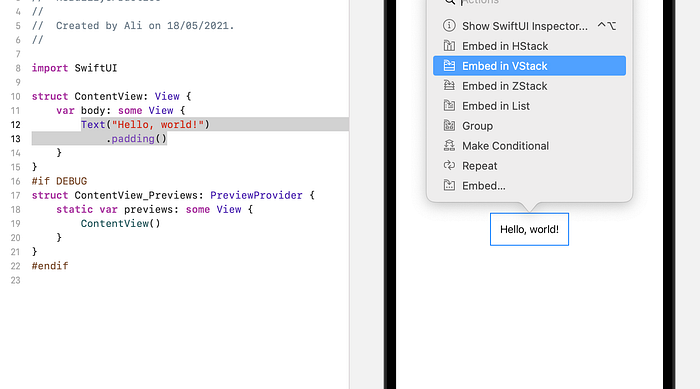
“Command-click the Hello World Text view in the canvas — notice Xcode highlights the code line — and select Embed in VStack: The canvas looks the same, but there’s now a VStack in your code.
Change TextView Attributes
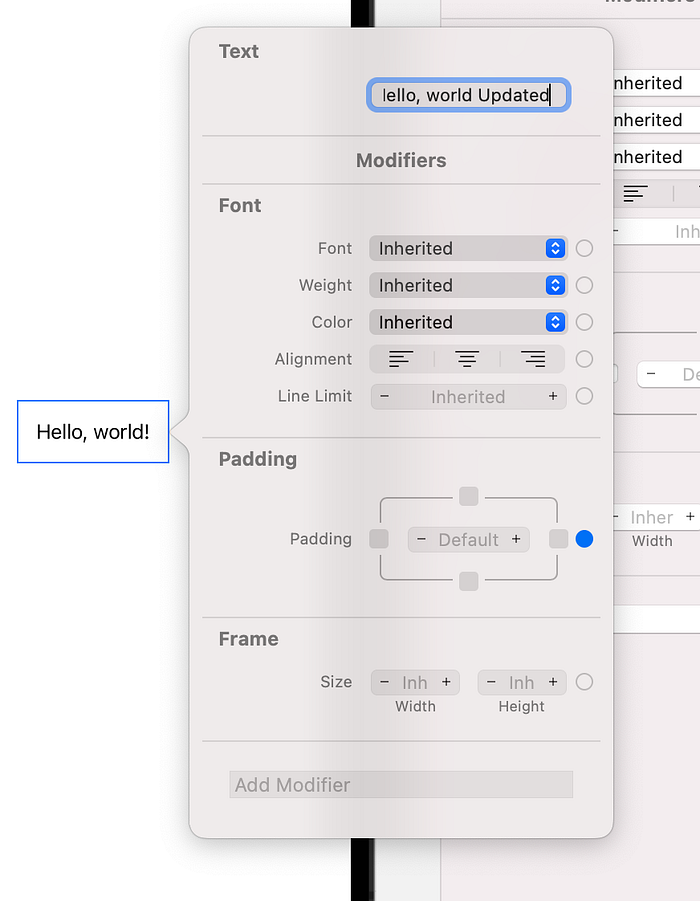
Command-click the Hello World Text view in the canvas → Show Swift UI Inspector
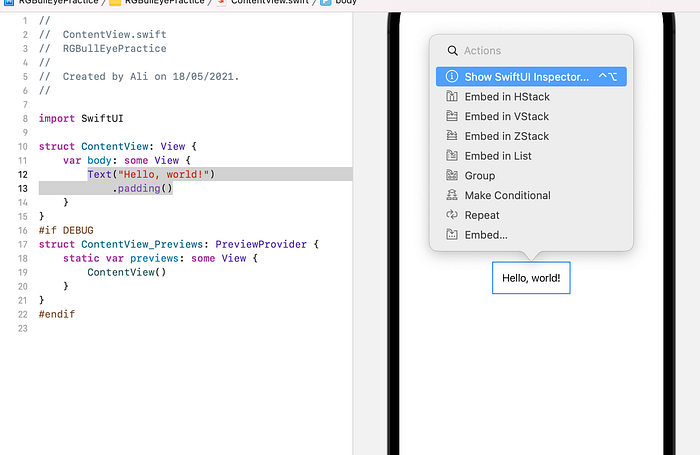
Your code updates to match! Just for fun, change the text in your code, and watch it change in the canvas. Then change it back. Efficient, right?
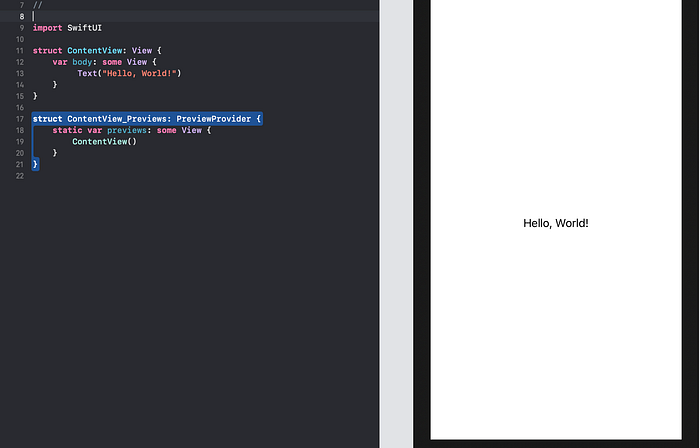
As shown in Figure 2 if you are coming from UIKit framework , we created a label and put it at the center of the screen. Let’s understand it and break things into bullets
- SwiftUI you work on the value types , a struct conforming to the View protocol and it only has a single requirement , a body property which provides some sort of UI element to be rendered. If you’re coming from UIKit or AppKitt, you’ve probably gotten used to views being defined as classes that inherit from a common view superclass instead of as structs conforming to protocols.
- There is a ‘some’ keyword as a return type which allow the type of view to be automatically inferred without explicitly setting its return type in code . They enable us to use generic protocols as functions’ return types while keeping the concrete type information private.
- Body property is an associated type so as long as there is a single element this is fine. Since the view protocol uses an associated type under the hood without specifying some keyword your are actually rendering a protocol with only a generic constraint not a concerete type. This some keyword return an opaque type which allows it to act as if it really were a concerete type.
- In Swift UI View is basic building block of user interface (define a piece of UI)
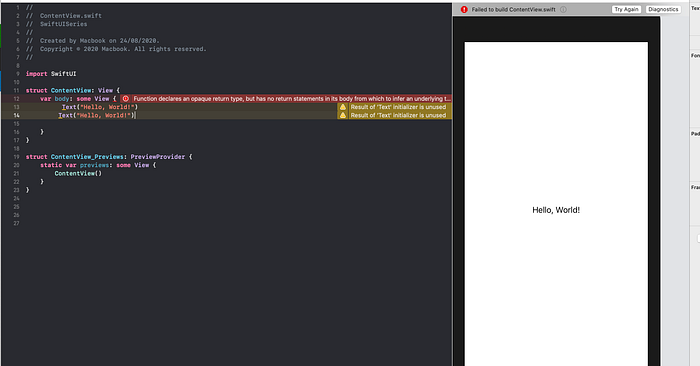
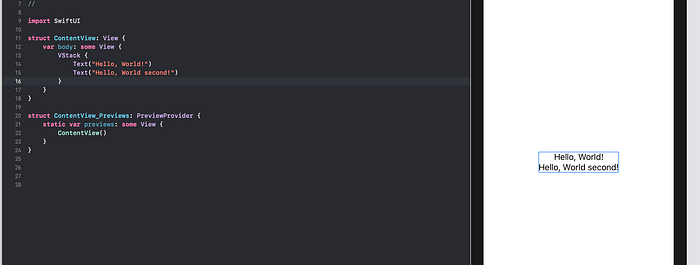
As shown in Figure 3 you get some error , when tries to add two label (Text) on the screen. This is because when creating a SwiftUI view, you describe its content, layout, and behavior in the view’s body property, however the body property only returns a single view. You can combine and embed multiple views in Stacks, which group views together horizontally, vertically, or back to front.
Stacks acts like container and in SwiftUI provides three distinct stacks, HStack → which arranges its children(i.e. subviews) in a horizontal line, next to each other. VStack → which arranges its children in a vertical line, i.e above and below each other. ZStack → which overlays its children, i.e. places them on top of each other, back to front, along the z depth axis. In later part we will cover this in details
As shown in Figure 4 we put in container and now we respect SwiftUI and return only one view which is a VStack.
Modifiers
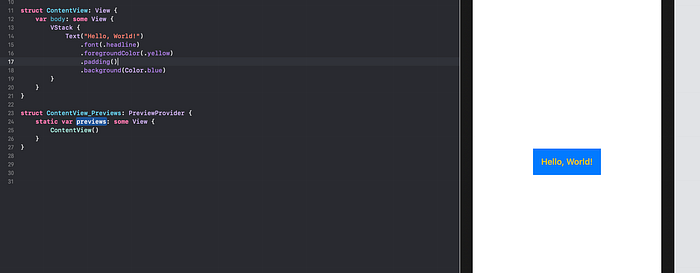
As shown in Figure 5 we added some styling to our Text component for that we called some builtin method. We call these kinds of methods modifiers and they’re used in SwiftUI to customize the way your views look or behave. . Few things to note
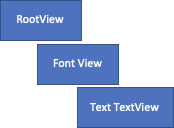
- Modifier creates a new view from an existing view. 😲 When the text is modified, a new view is inserted that wraps our existing text The new view tells SwiftUI to render that text with its new font. as shown in Figure 5.1 These modifiers can even be chained together.
- As shown in Figure 5 we change the text color of our title by adding a foreground color modifier. This adds another view into the view Tree that wraps our font modifier view as shown in Figure 5.2
- Now clearly our view hierarchy is starting to get bigger pretty quickly. And for the experienced UI programmers, this may be setting off some internal alarm bells. Because over the years we’ve trained ourselves to optimize the performance of our apps by keeping our view hierarchies as small and light as possible. But remember, we’re writing declarative code. And SwiftUI is our expert chef taking our views and skillfully producing a rendered result according to just what we ordered. And so even though we had to wrap our text in multiple wrapper views, SwiftUI collapses that down behind the scenes into an efficient data structure that is then used by the render system.And without having to worry about the performance impact, you’ll find that this chaining modifier syntax actually provides a lot of really nice benefits. In short don’t worry about that
SwiftUI encourages you to create small reusable views, then customize them with modifiers for the specific context where you use them. And don’t worry, SwiftUI collapses the modified view into an efficient data structure, so you get all this convenience with no visible performance hit.


Modifier Order Is Important
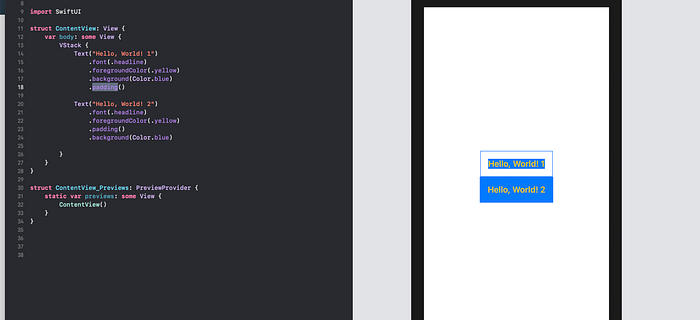
As shown in Figure 6 , you can see very straight forward that order is important.
- Let’s consider Text1, it first create a Text view with default font, then font will create another View and update to headline type. Then foregroundColor will create another view and change all its child color to yellow , then background color will create another View and change all its child color to blue then finally padding will create another view and will add padding. (That’s why background color is not apply to padding)
- In Text 2 we add padding first then background color that’s why it is working as expected
Next
In the next part we will see how data flow in SwiftUI. In short how to work and manage your Data with swift UI View